Content Marketing Workflow 101: Steps, Types & Free Template
How often do your content team members miss deadlines, provide inconsistent results, or face bottlenecks? If you do content marketing, most probably your answer is “more often than I would like to”.
But don’t worry, as you can easily resolve these issues with a content marketing workflow.
Content marketing workflow can help you organize your activities and avoid bottlenecks. After adopting it, you can achieve process streamlining and increase the predictability, timeliness, and quality of your team’s deliverables.
This guide will help you understand how content marketing workflows work and how to set up one in your team.If you are new to digital marketing, start with our digital marketing guide first. If not, then let’s get into content marketing workflows!
What is a Content Marketing Workflow?
A content marketing workflow comprises steps and tasks that different people in your team undertake to create a piece of content. There can be many types of content, like a blog post, a page on the website, or a whitepaper.
Content marketing workflow specifies:
- The types of professionals that you need to involve in the process.
- The order of steps that you should take from content ideation to publishing.
- The people responsible for each aspect of content production.
- The deadlines, the accepted number of days per step, etc.
A content marketing workflow also includes templates for various steps. For instance, you might have a template for writing a brief, a content ideation template, etc. This way, you can improve the consistency and the level of quality of the work your team completes.
But is it really worth spending time to build this whole process and all of those templates from scratch? The short answer is yes. But for more details on the benefits, we have compiled a list below.
7 Reasons Why a Content Marketing Workflow Matters
Content marketing is a complex process, especially if you aim for better consistency, quality, and a shorter delivery time. This complexity, however, becomes manageable as soon as you adopt a content marketing workflow.
There are plenty of more reasons to build and use a content marketing workflow. We have the main seven for you here.
1. Streamline collaboration and communication
A group of people (especially a large one) working on many pieces of content at the same time leads to hardships in communication and collaboration.
And here’s an example. Imagine your priorities change. Some people work on the new content project, while others decide to finish the old work first. You will start missing deadlines or losing quality.
With a workflow, a change in priority will automatically apply to everyone. So you can make sure that people finish the most important work first, then move on to the less critical tasks.
There is the communication side too. According to a study by the Economist Intelligence Unit, 34% of surveyed people noted that unclear responsibilities are the main cause of poor communication. Content marketing workflow helps you improve communication thanks to a clear definition of the tasks and responsibilities of each teammate.
2. Keep track of tasks and deadlines
If you are managing a large team with multiple projects, keeping track of everyone’s tasks and deadlines can be a burden, especially considering that a human mind can remember a maximum of 4 things at once. That’s why a good content marketing workflow should also include specialized software for marketers to track and manage all the tasks and deadlines automatically.
3. Improve organization across different teams (aka break down silos!)
Sometimes creating content means involving people from different departments. When you are in such a situation, you can face the risk of so-called “department silos”.
Basically, silos happen when there’s little communication between different teams. It occurs either because of company processes or even if they sit in different rooms. Department silos are notorious for decreasing the efficiency and quality of your work.
Content marketing workflows enable better communication and collaboration between teams thanks to set rules and standards for passing information from one team to another. For example, you can have a rule for your digital marketing experts to give short guidelines to your designers on the infographics in a whitepaper. These guidelines can be comments on an online document where the designer can ask questions to the marketer and get quick answers.
4. Reduce stress and employee burnout
Work-related stress is everywhere. The American Psychological Association reports exhaustion among 32% of Americans while Gallup claims that around 3/4 of workers have experienced some kind of burnout:
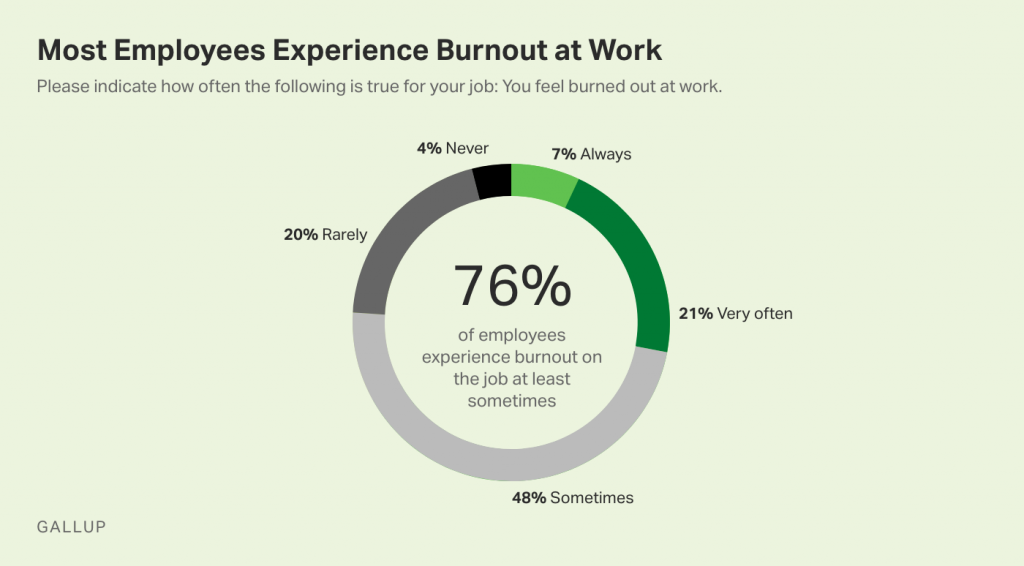
As mentioned before, a good content marketing workflow can help you communicate better and avoid missing deadlines. However, using workflows has another significant effect too – less stress and no burnout.
The reason is simple. People waste less time redoing their work because of miscommunication or bad collaboration. Everyone knows what they are supposed to do and when. There are no surprise tasks and deadlines.
All of this leads to peace of mind in your team and higher employee satisfaction rates.
5. Increase productivity and quantity of work produced
Let’s speak about meeting deadlines. A great side of having a content marketing workflow is that each step comes with an expected number of days to complete. With the workflow set up in your team, you know that, on average, it takes about three days to write the content and another two days to make all the designs and infographics.
When your work is predictable, you can meet deadlines. When you can meet deadlines, you can take on more projects, as there is no need to keep “buffer” days and weeks on your editorial calendar (some teams use those buffer days to combat the risk of missing deadlines).
Content marketing blogs are a good example of organized publishing and meeting deadlines. They constantly produce new articles with high-quality content while maintaining stable and predictable schedules.
6. Save time
Another great side of content marketing workflows is they save time and resources. They give you clear steps, responsibilities, and a timeline, which means three things:
- Less risk of doing double work. You know exactly what is expected from you. Thus, there is less risk of completing your task incorrectly and redoing your work.
- Lower possibility of having no work to do and waiting for others. If you complete your part in project 1 and need to wait for other teammates, you can just switch to project 2.
- Less time spent on reporting. If you are a manager, you do not need to ask for status updates from everyone as you can see the progress of everyone’s tasks on a single board and get notifications on any change.
Having a birds-eye view of your team’s tasks on a board also means that you can detect and fix any impediments before they become an issue, thus saving time on “fire-fighting”.
7. Make it easy for new employees
As a rule of thumb, it takes around 3 months for the newly hired employee to become 100% effective at their responsibilities. Transparent processes and responsibilities are one of the key factors to improve onboarding.
Thus, if you make content marketing workflow part of the onboarding process, you can shorten the time your new employee needs to get up to speed. You can consult with your HR team to give you dedicated time for training the hirees and familiarizing them with your team’s workflow.
There are no doubts that setting up a content marketing workflow is worth every minute spent on it. But what does it look like? Let’s answer this question with four examples.
3 Prominent Types of Workflows for Effective Content Creation Management
Content marketing workflows can differ greatly from one another. Every team and company has its own process tailored to its needs and reality. However, there are standard workflows too. Usually, companies will take one of these standard types and change them to fit their requirements.
Here are the three most common ones you can use, too, for an easy start.
Status-based type
With the status-based approach, you assign statuses to each piece of content your team is producing. Each status represents one step or phase in the content creation process.
Typically, one person (or a team) handles one status. After completing their part, the team changes the status to the next one in the workflow. For instance, when your content writers are working on the article, the workflow status can be “Create”. When they complete the writing, the workflow status changes to “Review & Approve” which is a signal to the editorial team that it is their turn to jump in for checking and proofreading the article.
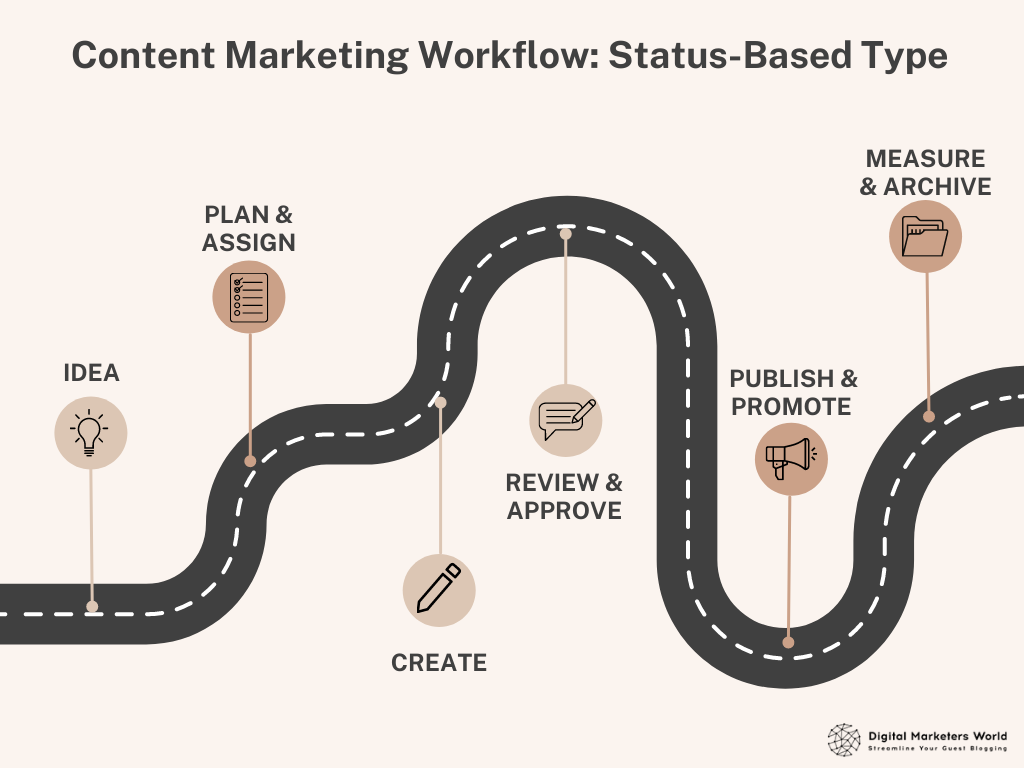
Status-based workflows have a set of lucrative benefits:
- Clarity. It is clear who is responsible for each step in the workflow.
- Transparency. Everybody sees the status of all pieces of content and who is working on them.
But this type of workflow is not perfect, as it comes with a couple of downsides too:
- No task organization within a single status. Imagine you have 5 designers. All of them are responsible for the design phase. With the status-based type, it is unclear how work is distributed among them, and how they are going to collaborate on the tasks.
- Hard to manage parallel work. Sometimes there are tasks and activities that your teammates can do at the same time (e.g. preparing the technical environment for the blog and content creation). It is hard to manage such work with the status-based workflow type.
Overall, this approach works well when you have a couple of people in your team, but it becomes hard to use when the team gets larger. Let’s see if the next one is a better fit.
Task-based type
The name of this approach speaks for itself as well. In the task-based workflows, you break down each step of content creation into tasks and assign them to relevant teammates.
So, this time, each person or team gets a task delegated to them instead of status. As soon as they finish their activities, they simply mark the task as done. Sometimes these tasks have their basic statuses as well. A common set of statuses is “To Do”, “In Progress”, “Review”, “Done”.
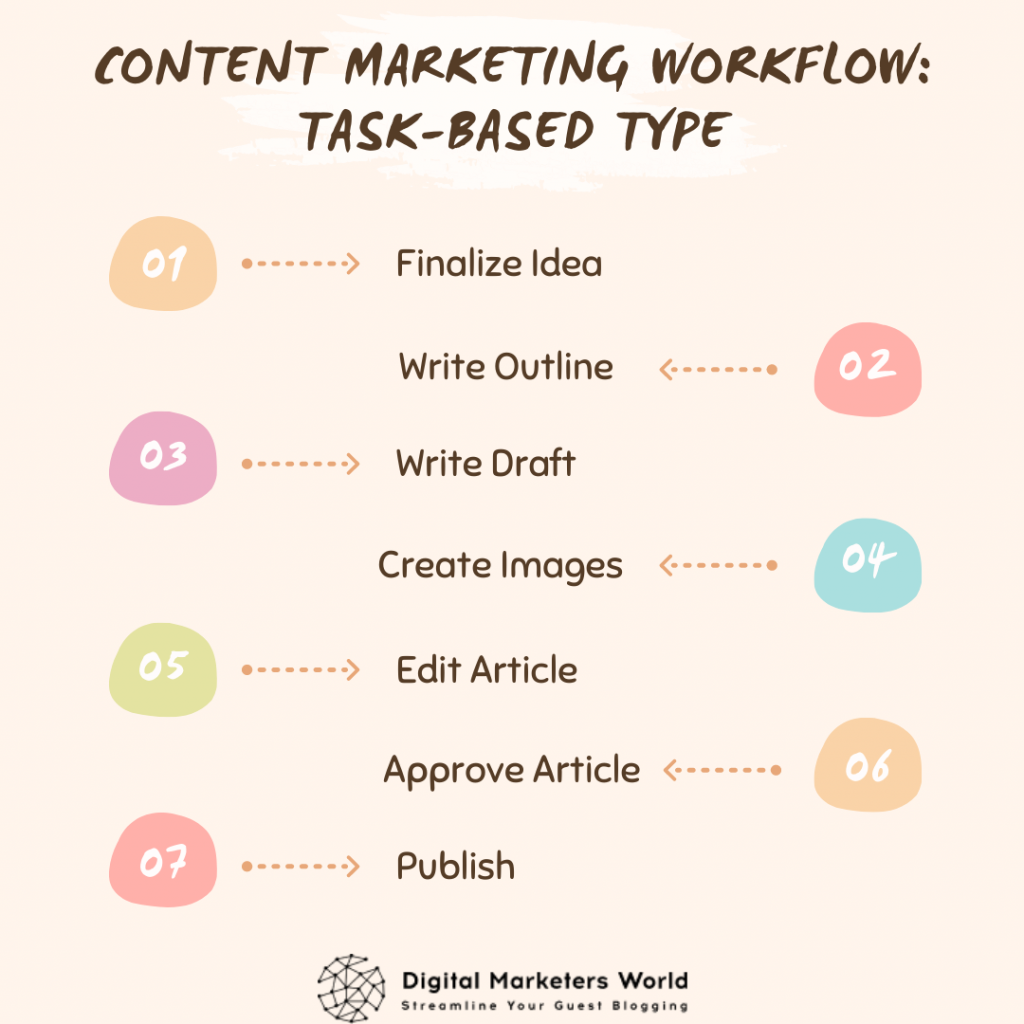
The task-based approach comes with pros and cons, too. Here is what is great about this approach:
- Better task tracking through statuses. As each task has basic statuses (To Do, In Progress, Review, Done), you can track their progress individually. For example, you can see that the design work is under review now and the content creation has not started yet.
- Parallel work is easy to manage. Unlike the status-based approach, the task-based one helps you track the work of multiple teammates who work in parallel as each one updates the status of their own task at the same time.
- Work is easy to distribute among multiple teammates. If there are several people responsible for one workflow aspect (e.g., design), then you can have multiple tasks assigned to them with a clear work scope defined for each person.
What is the disadvantage of this approach, then?
It is hard to manage the order of workflow steps. The status-based workflow illustrates the order of steps, so you know that content writing comes after making a content brief. The task-based approach does not have this advantage, and it is not clear which step comes first.
The status-based approach is best for a small team where you have one person responsible per status. The task-based approach fits a single large team the best, as it enables parallel work and task distribution among teammates. But both approaches are not a solid fit when multiple departments are working on the content. This is where the swim lane type fits the best. Let’s take a closer look at it.
Swim lane type
This term comes from swimming sports, where the pool is divided into several swim lanes for each athlete.
The swim lane approach to organizing content marketing workflows means having separate lanes for each department or team involved in content management and production. As the work progresses, you move the content from one department (swim lane) to another.
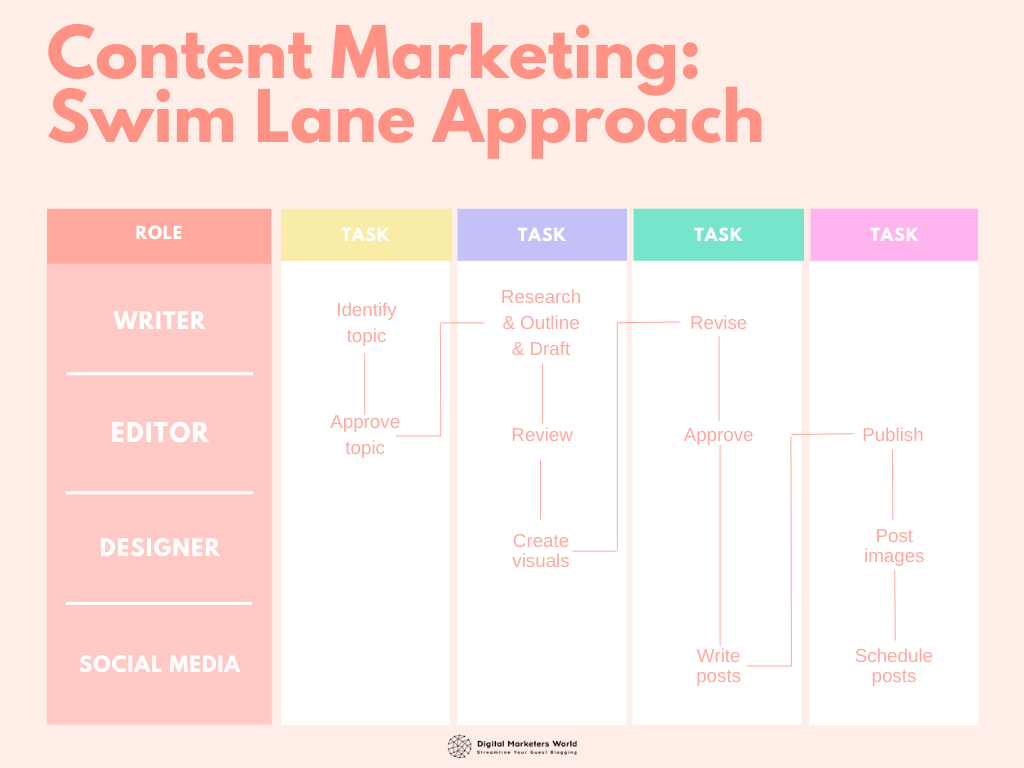
Now let’s see the strong and weak sides of this workflow type.
The swim lane approach is excellent for:
- Companies with multiple departments. It clearly defines the boundaries and responsibilities for each department. It also sets the order of stages and the name of the department responsible for each stage.
- Workflows where departments handle multiple steps: Imagine there is a subject matter expert. This person would need to approve the content, then the designs, then the final work. The swim lane approach clearly shows where the subject expert should enter the scene and do the review.
Overall, this approach looks great, but sometimes it overcomplicates the process. If you have a small team where one person is responsible for multiple roles (e.g. writer and editor at the same time), this approach will add confusion and miscommunication.
Bonus: Combination of types for maximum results
This is actually what we want to suggest you try. The truth is that the types of workflows we discussed are all theoretical. In practice, you might find that a combination of status and swim lane approach works the best for you. Alternatively, you might enjoy the combo of task and status approach better.
It all depends on your team, your projects, your company, and other aspects. For example, you can set up a mix of status and task-based workflow for a small content team that needs to collaborate with a larger team of software developers. Since your content team is small, they can work with the status-based approach. When they hand the work over to developers, the development team can work with the task-based approach as they need to do the same kind of work with several people, therefore tasks must be distributed among them.
Now that we have a good idea of how to structure our content marketing workflow, so it is time to understand the steps you need to make it work.
9-Step Process to an Efficient Content Marketing Workflow
The name “content marketing workflow” might give you the impression that it is something complex and time-consuming, and you will never manage to build one. In reality, it is fairly easy to create and set it up.
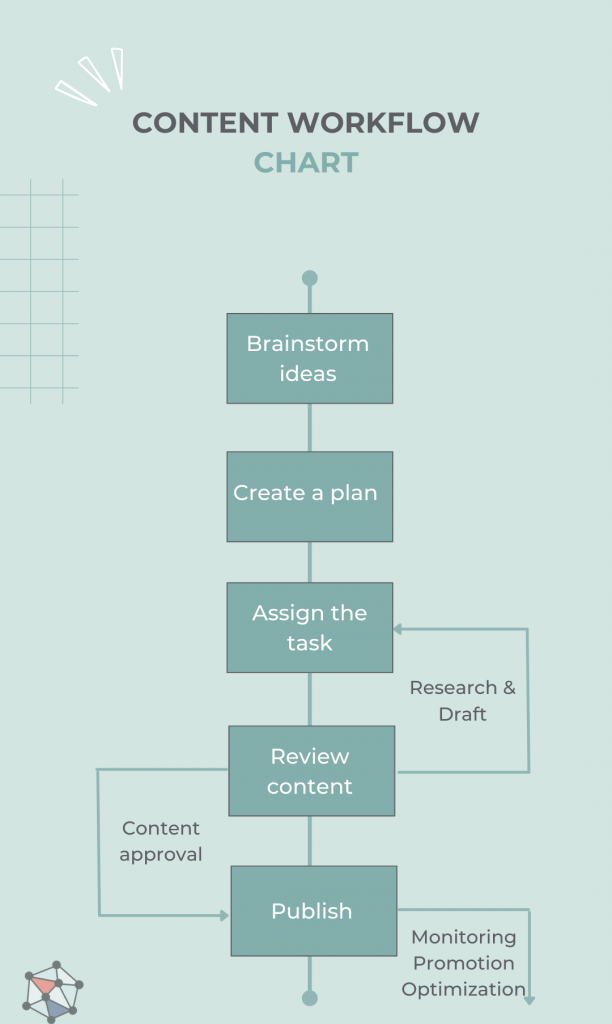
Let us make it even easier for you by breaking down the entire content creation process into these nine steps:
- Collect content ideas
- Organize and plan content ideas
- Assign content creation related tasks
- Review content
- Schedule content to be published
- Publish content
- Promote content
- Keep track and measure content performance
- Optimize content and content creation process
Here is what it looks like on the graph.
You also need to consider adding the following specialists as workflow participants:
- Business Owners
- Digital Marketing Specialists
- Content Writers
- Graphic Designers
- Experts in the Subject (e.g., legal experts, HRs, etc.)
- Software Developers
Now let’s go over these nine steps one by one and understand their details and intricacies.
Step #1: Collect content ideas
Every great article or whitepaper started as an idea.
We know that sometimes ideas and inspiration come at unpredictable times and places. However, there is an effective practice to make content ideation easier to manage.
Content marketing teams usually do deep research on topics and competitors and determine content gaps using specialized tools (e.g. Google Trends, Ahrefs, SEMrush, Dashword, and many others). They also gather suggestions from Google’s “People also ask” section to find the most trending questions on each topic.
Afterward, they organize recurring brainstorming meetings where they list all these researched topics they can cover in the upcoming week, month, or quarter (depending on how far into the future you plan your content strategy).
The rules of the ideation meeting are pretty simple:
- Gather everyone in the same room (physical or digital).
- Write as many ideas as come to your mind.
- Go over each of them and give scores based on their relevance and feasibility.
- Filter out the ones with a perfect score and discuss details on how to make sure the best topics remain relevant.
- Prepare your list of content ideas for the next month/quarter using the ideas with a perfect score.
The team usually organizes these brainstorming meetings once or twice a month if they do monthly planning. If the team does weekly planning, then having one meeting per week is sufficient.
That’s it. Easy and quick to do. Just remember that there are no bad ideas, and you should not discard an idea without grading it.
Step #2: Organize and plan content ideas
Sometimes, it is not the shortage of ideas that content teams struggle with. Sometimes the hardship is about organizing and managing your ideas.
Let’s list several common ways of organizing content ideas, but before choosing one, consider:
- The number of people that will access and contribute to the content idea list.
- The frequency of adding new items to the list.
- How detailed (target persona, keywords, outline, etc.) your topic suggestion needs to be.
The common content idea organization methods are:
- Using a whiteboard. Your ideas are in front of your eyes and you can think about and develop them all the time. This approach works best for very small teams with a couple of members.
- Using a spreadsheet. In this case, you get the added benefit of searching through your list or filtering/sorting it. This one is better when you have a larger team and a long list of ideas.
- Kanban board (using a task management app like Trello or Asana). With these boards, you can assign ideas to certain people to verify, comment on, or send back for revision. The cards on these boards can also accommodate more information and details than a spreadsheet. So, boards are more suitable when you manage large teams and multiple projects.
No matter which method you choose, do not discard the ideas that initially did not make it to this list. There is always a chance they will become more relevant next month or later.
In terms of deciding which ideas make it to the list, you can apply a grading system where you define the metrics that matter the most to you (e.g. idea trendiness, keyword volume, etc.) and grade your ideas based on these metrics.
Step #3: Assign content creation related tasks
Next up, you pick the first content planned for the month and start the assignment process. Depending on the type of workflow, you will either create tasks for each teammate, or the content will change hands among them until done.
Let’s say you use the task-based workflow. Here, you will need to create tasks for :
- The person doing the research and creating the content outline.
- Your designer, who will prepare the creatives.
- The content creator, who will do the actual writing.
- Any subject experts (if applicable) responsible for the review and approval process of the piece.
Once the assignments are ready, the teams start their work and gradually send all tasks to “Done”.
Step #4: Review content
The review process is critical for your content needs. No matter how experienced your copywriter is, there is always a chance that they might miss an important point or leave typos. So, a content review is a necessary step to transform a rough draft into a beautiful, polished article or post.
However, the review is not only about proofreading and fixing grammar. These revisions are primarily about checking the meaning and the message of your content. The editors, digital marketing experts, and, if needed, subject matter experts all look at the content from their point of view and suggest changes and improvements.
Next, the content writer analyzes all suggestions, makes the changes, and sends the content for the final review. This is when the team fixes the last mistakes and makes the final touches to make the content ready for publishing.
Step #5: Schedule content to be published
Now that you have your content ready, you can decide on the actual date of it going live. Although you need the exact date at this point, we recommend you set approximate publish dates for each piece of content during the planning meeting.
It is much easier for you to manage your team’s content operations if you set preliminary publishing dates when doing content planning for the month. These dates in your content calendar serve as your deadlines. As you know how many days each content creation phase will take (e.g. writing takes three days, review takes another two days, and so on), you can count back from your publishing date and set due dates for each phase (e.g. review deadline can be one day before publishing, writing deadline can be 3 days before, etc.).
When setting the exact publishing date, take into consideration that there are social media posts to publish as well. So make sure to have them scheduled in an appropriate tool. For scheduling on social media platforms, you can check out our list of Hootsuite alternatives.
Step #6: Publish content
Next, your editors and digital marketing experts come into play. Editors will add the content and creatives to your CMS platform (e.g., WordPress) and other platforms where your content should appear (e.g., Medium). Before publishing, the editors will also check the following:
- How catchy the title is.
- The overall quality of the content.
- The content meets customer needs.
- The information in the content is based on trusted sources.
- There is a clear structure in the article.
- Also visuals, spelling, grammar, etc.
Digital marketers, on the other hand, will review the SEO optimization (e.g. meta tags, keywords, and other technical information).
When all of it is done, you click on publish, and your content will go live!
Step #7: Promote content
Publishing on your website and platforms isn’t the final part of the job as you need to start the promotion to bring more traffic to your newly published content.
Here’s a small promotion checklist you can follow:
- Make sure you have buttons underneath the article to share your content on social media.
- Use keywords effectively to increase organic search traffic.
- Add internal links and get a good backlink profile for your new content.
- Share on your social media channels (e.g., LinkedIn, Twitter)
- Share on alternative channels such as blogging websites (like Medium), podcast channels, email marketing, and influencer accounts.
If you do account-based marketing, then share your content with the account managers to include in their marketing campaigns.
Step #8: Keep track and measure content performance
Now that your content is live and well-promoted, it is time to see how well it performs.
To measure the performance, your content marketing workflow should include:
- List of tools to use for tracking metrics and their automation.
- List of metrics to measure. For emails, we have a list of 7 + 1 metrics for you to track.
- Frequency and timing of checking and recording your KPIs (e.g., checking your lead list performance two days after sending content to the prospects).
- “Lessons learned” meetings to analyze good and bad results.
With this process in place, your team will find and fix any issues with KPIs before they do damage.
Step #9: Optimize content and content creation process
The last step is all about doing it better.
As soon as you have the KPI results, you can use this data to optimize your content. Your workflow will usually have recurring tasks or meetings called performance monitoring and content audits for this.
During a content audit, you will check the performance of each piece of content with the intent of improving the performance of each one as much as possible. In case you stumble upon a content piece that does not perform well, you have several choices, such as:
- Perform new keyword research and reoptimize the content based on it, optimize internal and external links, images, etc.
- Merge it with another similar article and redirect the old URL to the new one.
- Keep the article as is.
Sometimes, during the audit, you may also find articles that perform well but rank with irrelevant keywords. In this case, you need to reoptimize it as well. However, there are no concrete rules on what to do with such articles. As long as it doesn’t hurt your website, any solution can work. It all depends on your intuition as a marketer and your website’s goals.
That was not complicated, right? You can plan and prepare your whole content marketing workflow in only these nine simple steps. And you don’t have to make it from scratch either. We have a template for you to use.
Grab Our Free Content Marketing Workflow Template
That’s right. We’ve got you covered! We have built a content marketing workflow template following all the best practices in the industry and the advice and feedback of content marketing experts.
You can either use this template as-is or get inspiration from it to create your own version. Regardless, you should always remember that the best processes and templates are the ones that specifically fit your team, company, and projects.
The template is easy to use. Simply fill in the fields for assignees and deadlines for each step and place it somewhere visible to all of your team. It will inform your team about the order of steps, the people responsible for each step, and their deadlines.
Now you know about the benefits, types, and steps of creating a content marketing strategy with its workflow. You have a template in your hand too. Why not start setting it up at your team already?
Now Over to You
Content marketing workflows bring consistency, predictability, and transparency to your teams. They help distribute responsibilities, set realistic deadlines, decrease inefficiencies, regulate your quality standards, and help your teammates maintain a healthy work/life balance.
No matter which workflow type you choose or how you change our template, you will still get lots of benefits from it. Good luck streamlining your content marketing!
Our blog is a treasure chest of guides, comparisons, and best practices. Go take a look!

Sona Kalantaryan is a senior digital marketer with a creative past. Big fan of high cinema and well-optimized landing pages. She authors guides by sharing the best practices and does it the right way!
